The snake plant is a very resilient plant that is difficult to kill. Low light conditions, drought, and casual neglect are not fatal to it.
Don’t believe the myth that plastic plants are the only ones you can keep alive. The snake plant, also known as Sansevieria or Dracaena trifasciata, even makes up for your carelessness by assisting with indoor air quality.
Sansevierias have historically had great value in the civilizations of China, Africa, Japan, and Brazil. They were kept close to doors within the home in China because it was thought that the eight virtues might travel through them. The plant was treasured for its medical properties, used to make fiber, and used as a charm to defend against bewitching in Africa.
In honor of Raimondo di Sangro, Prince of Sansevero, an active supporter of horticulture in 18th-century Italy, the species was named. The wavy stripe pattern on its leaves gave rise to its common name. The snake plant is not only a common design item for many different locations, but it also has historical origins. The snake plant, also known as Sansevieria, would undoubtedly be among the front-runners if there were an award for the plant with the most tolerance. Snake plant maintenance is fairly simple. With their strappy leaves and architectural design, these plants may be neglected for weeks at a time and yet seem healthy.
Snake Plant Overview
Sansevieria are perennial evergreen plants with a height range of eight inches to twelve feet. They’re about two-foot-long sword-like leaves that have pointed tips. The dark green foliage is rigid, wide, and erect, and it is striped with white and yellow. They are renowned for their capacity to endure in even the most unfavorable growth environments such as low humidity. They are recognized for their ability to clean the air we breathe as well. Snake plants are excellent bedside plants since they mostly create oxygen at night.
Snake plants are still one of the most common houseplants, despite their name and the negative connotations attached to them. Because they require so little maintenance, it can be challenging to determine whether repotting a snake plant might be advantageous. Is your snake plant about to burst through the pot? If so, a bigger container for your snake plant is certainly overdue. A root-bound plant will exhibit symptoms such as discolored leaves, an overgrowth of roots, top-heavy growth, and withering. We’ve put up a few instructions to aid you along as you discover how to re-pot a snake plant.
5 Indications That Your Snake Plant Needs a Repot
Let’s first confirm that your snake plant does, in fact, require repotting. Repotting a plant that doesn’t require it might stress it out unnecessarily. These few indicators, which only occur when it is absolutely required, should never be ignored.
The drainage holes have allowed the roots to sprout
This warning symbol is present in all indoor plants. Your plant requires repotting if you notice any roots poking through the drainage openings. This is an indication that the roots are being forced out of the pot’s bottom because they have nowhere else to go. The majority of the container is probably already occupied by roots at this time since they have run out of room to spread.
If you continue to use your pot in this manner, the overcrowding will make it difficult for it to absorb water and nutrients from the soil. The plant will eventually die as a result of this stunted development. Gather your supplies and start repotting as soon as you notice roots squeezing through the drainage holes.
The plant has many pups
A plant with a single pup may not necessarily require repotting, but a plant with several pups will ultimately grow larger and outgrow the container it is in. If so, you can use the time spent repotting to propagate your plants.
The soil dries out too fast
A container that drains too fast, where water seems to almost instantly rush out the bottom instead of soaking the soil, won’t grow a healthy plant. Although snake plants don’t require much water and may survive without it for long periods of time, they will suffer if they do.
An indicator of bad soil is water draining too rapidly. Regular watering and root expansion cause the soil to deteriorate and lose structure over time. Water and nutrients can no longer be delivered to the plant’s roots by it since it is unable to hold onto them.
The container is breaking
Under severe circumstances, the snake plant may grow so quickly and take up so much space that the container it is in will literally break. Rhizomes pressing against the pot’s edges and changing its form indicate whether it is about to shatter. Snake plants can tolerate some overcrowding, but they can’t live in broken containers.
When Do I Need to Repot?
The ideal time to perform this repotting is in the very early spring or late winter. As a result, the transplant takes place while the plant is not actively growing. The amount of light is now increasing, and the growth of the snake plant is ready to accelerate. The ideal time to prune snake plants is right now. However, there are other times of the year when you can repot your snake plant.
How To Repot a Snake Plant
Step 1: Gather your Supplies
Gather all the materials needed to re-pot a snake plant before you do anything else. Make sure the drainage hole at the bottom of your planter pot is there. The new planter has to be 1-2 inches wider than your current container. The following items are required for repotting snake plants:
- Organic Lightweight Potting Mix
- Container for Plants with Drain Hole
- Garden fork
Step 2: Prepare the Soil
Prepare the soil first, as it is the base of all healthy plants. A houseplant potting mix is available from your neighborhood nursery or you may prepare your own. Making your own soil lets you adjust it to your snake plant’s demands, which might differ greatly from those of other houseplants. For snake plants, coarse, well-draining soil works best. To create your own blend, use equal parts river sand and premium standard potting mix. This effectively mimics the ideal circumstances for snake plants and substantially improves drainage.
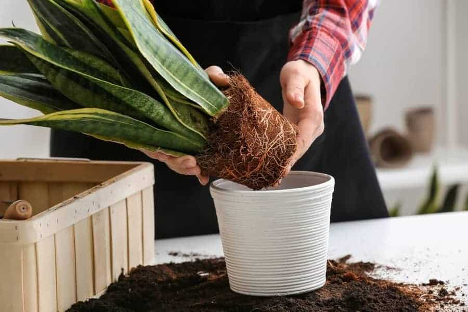
Step 3: Pull the Roots of the Old Planter Pot
If the pot hasn’t already broken, press the sides to loosen the dirt from the sides before removing it. It’s preferable to wait a few days before beginning to stop watering your plant in order to make the removal procedure go much more smoothly. Next, flip the plant over and carefully remove it from the pot.
Plastic pots may need to be cut off if they are truly immovable despite attempts to compress the edges if they become stuck. It may be necessary to use a trowel or soil knife to free the roots of plants that are caught within earthenware pots.
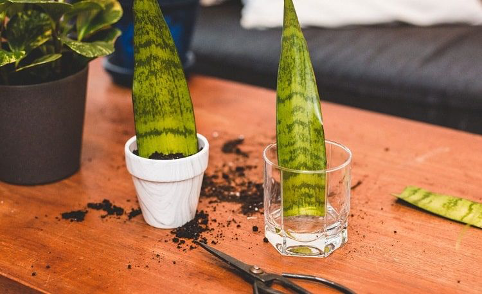
Step 4: Remove any Pups
Any pups that are ready for propagation should have their rhizomes evident once the roots are exposed. Make sure the roots are properly cleansed and the rhizomes are visible. After that, use a very sharp knife to make a clean incision through the rhizome.
Each portion needs to be able to stand on its own two feet of roots. If the pups don’t have enough roots, let them continue to develop on the plant before taking them off. Without roots, a pup cannot establish itself and must still obtain nutrients from the parent plant in order to flourish. Keep the parent plant and each pup apart. Set aside all of the divisions so that they may be planted simultaneously in fresh pots.
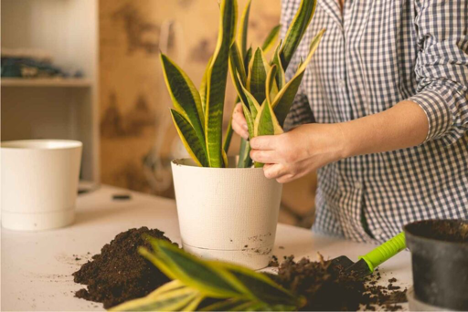
Step 5: Repot a Snake Plant
The Snake Plant has to be placed in its new planter at this time. Put some potting soil in the planter’s bottom if it’s deeper than the old one was. Otherwise, just place the root ball into the barren planter. In any case, there should be enough room for watering and mulching by keeping the top of the soil surrounding the plant’s base about a half inch to an inch below the top rim of the planter. To fill the area between the root ball and the pot’s sides, gently add extra potting soil to the sides of the planter.
Caring for Your Repotted Snake Plant
While it heals, keep your sansevieria out of the sun for a few weeks. For at least one month, avoid fertilizing. Watch your water usage closely. You could discover that you need to water more or less frequently than you did prior to repotting. When the top inch of the soil feels dry, water the snake plant. Make sure to swiftly drain any water that has accumulated in the drip tray underneath the pot so that the soil doesn’t become soggy. Root rot or fungal issues on freshly cut or damaged roots can be brought on by too damp soil.
SNAKE PLANT REPOTTING FAQS
When should a snake plant be repotted?
One indication that the grow pot has to be replanted is if it is cracked. Repotting your snake plants is typically done every 4-6 years.
What sort of soil suits snake plants?
Snake plants prefer a soil mixture that is clumpy, well-draining, and aerated. You don’t want the soil to be continuously moist since they store water in their rhizomes and thick leaves.
Are snake plants tolerant of crowds?
In their containers, snake plants perform well growing closely together.